
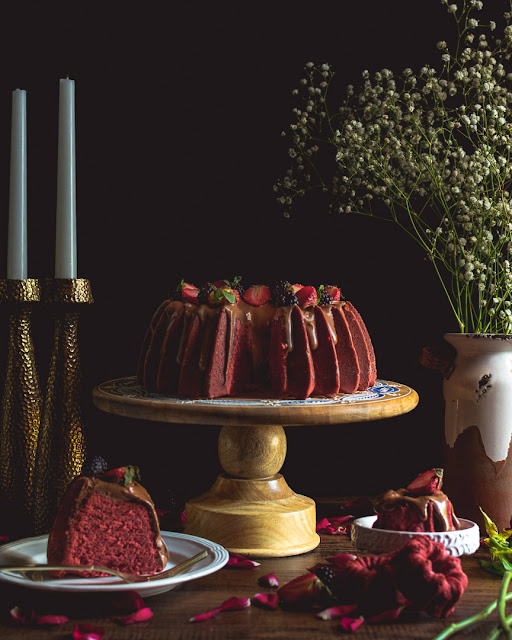
A perfectly dense and decadent Red Velvet Pound Cake. Lightly flavored with chocolate and hint of espresso covered in a tangy and sweet chocolate cream cheese frosting.

This post may contain affiliate links, please see my affiliate notice for details.
Although red velvet cake is a southern staple, its origin might not have began in the south. The birth of velvet cakes began in the 19th century when bakers began adding vinegar to their cakes. The result was an incredibly soft, tender and moist crumb. Around the 20th century devil's food cake, a rich chocolate cake, came into the picture and many mark this as the begins of the red velvet cake.
Red velvet cake was originally dyed its famous color using beet juice, however during the Great Depression, Adams Extract Co introduced food coloring into the market by promoting a red vevlet cake recipe. Simultaneously, the Waldorf-Astoria in New York City also began featuring the cake on its menu. Both believe they are the inventor of the beloved cake but the truth is no one knows for sure. Either way, red velvet cakes lovers rejoice in its existence.
What You Need For This Recipe
- Unsalted Butter
- Cream Cheese
- Granulated Sugar
- Eggs
- All Purpose Flour
- Cocoa Powder
- Espresso Powder
- Salt
- Buttermilk
- Vanilla
- Red Food Coloring, Gel or Liquid
- Powdered Sugar
How To Make A Red Velvet Pound Cake?
Start by bringing all of your ingredients to room temperature and pre-heating your oven to 325 degrees. Generously brush your bundt pan with pan release and set aside. More on this in my bundt pan tips below.
In a large bowl using a stand or hand mixer, cream together the butter, cream cheese and sugar on medium speed, until light and fluffy and slightly pale in color. Add in the eggs one at a time. When all incorporated scrape the bottom and the sides of your bowl. Sift in the flour, cocoa powder, espresso powder and salt. Stop mixing when a few streaks of flour is left, then continue mix by hand, scraping the sides and the bottom of the bowl.
Lastly mix in the buttermilk and red food color. Like with the flour once you have only streaks of milk left, stop mixing with the machine and continue mixing by hand. As always, scrape the sides and the bottom of your bowl.
There few type of food color, but the kind I prefer gel food color like this one from Americolor. However, liquid food color works as well. If you are using liquid food color and try not to add more than what's in the recipe, it can throw off the proportions and negatively effect the cake.
Pour batter into your prepared bundt pan. Gently tap the pan on counter a few times to release any air pockets. Bake for an hour and 10 minutes or until a toothpick comes out clean. If the cake is taking longer to bake, cover it with aluminum foil and bake until done.
The foil will prevent the cake from over browning. Allow to cool in the pan for 10 minutes, then flip onto a baking rack and cool completely before icing.
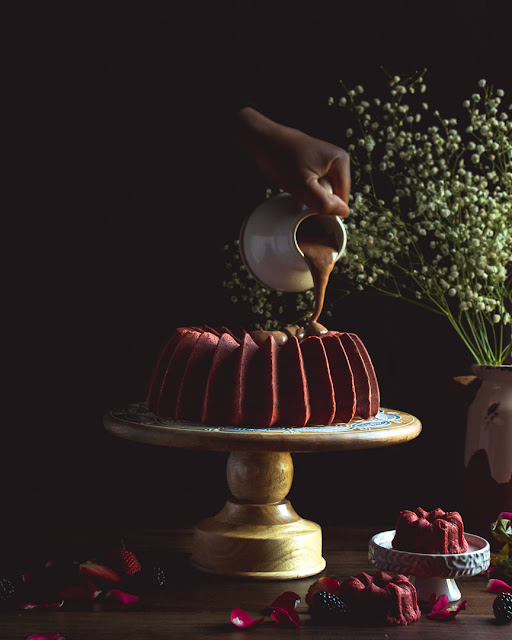
For the chocolate cream cheese glaze, beat the butter and cream cheese till smooth and creamy. Then add in powdered sugar, cocoa powder and milk mix til incorporated and smooth. If the glaze isn't a pourable, add milk one tablespoon at a time until you have the right consistency. Pour over cake and decorate with fresh berries if desired. Store in the fridge for up to 4 days.


Bundt Pan Tips Tricks
This recipe starts off with choosing the right bundt pan. Bundt pans come in many shapes and sizes. Nordic ware is my favorite brand. Their quality is always consistent and they have beautiful designs.
Speaking of designs, the more intricate, the more difficult getting a cake out will be. Using pan release is your best bet. There are plenty of brands out there that have good reviews like Pan and Wilton. I however have always used a homemade version from Sugar Geek Show. Another option is to generously brush on vegetable shorting with pastry brush or paper towel and dust with flour, or cocoa powder for a chocolate cake, making sure not to leave any clumps of flour in the pan.
When spraying or brushing on the pan release make sure you are getting into every nook and cranny even put in a little extra in spots that might be a little difficult. But if all else fails and cake doest come out in pieces, patch it up while the cake is still warm. The heat will help it to stick. And always remember icing can cover a multitude of sins.

Tips For Making This Recipe
- Bundt Pan Size: This recipe perfectly fills a 10 cup bundt pan but you can also use a 12 cup which will give you a short cake. If using a pan large an 12 cup check the doneness at 1 hour and every 5 minutes after that.
- Whip the butter and the sugar until light and fluffy (about 5 minutes).
- Once all of the flour is incorporated stop mixing and don't forget to scrape the sides and bottom of the bowl
- If your cake isn't done after the 1 hour and 10 minutes, cover the cake with aluminum foil until done. This will prevent the cake from over browning.
- If the frosting is too thick to pour add in 1 tablespoon of milk at a time till the constancy is pourable.
Enjoy,


No comments
Post a Comment